This how-to was written up by Ryan, aka originalrumrunner, on the ChopCult forum. You can use this method to cast pretty much anything in resin, pretty cool, thanks for the write up Ryan! Also, Photo credit goes to Henri Thomassen.
This may be a bit artsy for the 'Cult but I had to put it out there…I think the customization of the process will suit the readers well, as I know we’re a creative bunch.
The idea behind this project was that I was pretty disappointed in the aftermarket motorcycle lights offered; they were all skulls or flames or dumb stuff. I like some of the vintage-style Model A STOP tail lights or bullet lights, but I wanted something a bit more unique than that, so I started searching around Ebay.
Figure 1. Won this wall hanging off of Ebay and the madness began. Who the hell would hang this in their house? I guess it could make a cool rapper necklace…
Won a hummingbird hanging on Ebay for $3.49. They came in a set of two, but I knew I only needed this one; it was hard finding a bird with the right amount of detail that was also in a good position for a motorcycle tail light; taking into account screw placement, position on the bike, etc. I also knew I needed a hummingbird because if you've seen my bike you'll understand why...but this is where you use your imagination; this process can work on any shape you can find. Hell, make a Hitler portrait or a dildo or a viking riding a wolf throwing a skull. Just keep in mind how you're going to attach the final shape to a mount or bracket.

Figure 2. The hummingbird with a clay build-up on the back. This is regular modeler’s clay you can get at any art store. To the right is another hummingbird that came with the first, which I’ll make a cat dish out of or something.
Obviously, the hanging wasn’t deep enough to house a bulb, so I went to work making a clay housing for the bird that was deep enough for a light; I used an old Harley light as a reference as to how deep to make it for an 1157 bulb. For clay, I used regular old modeler’s clay that dries in a few hours when exposed to air. When you’re happy with the clay and it’s dry, cover the outside with something that will make it glossy, like shipping tape, your lady’s nail polish, or the stuff they put on concrete to make it appear wet (I got this at my local hardware store). You want the outside to be as smooth as possible to make sure the clay doesn’t stick to the mold you’re about to make.
Next you need to pour a mold around this model. I used a two-part silicone mold and you have to pour it around the object, slowly, so air bubbles don’t get trapped. The worst part is it comes in 16-oz kits (about $30-$40 each!) so you don’t have a ton of material to play with. The good news is that once you have the mold, you can use it hundreds of times with no loss of detail. This stuff is super strong, so you don’t really need thick walls. Also, use a plastic container, not a glass one, because getting the mold out of the container requires that you cut it out. You have to get the mold out of the container so that you can peel away the sides and remove the clay model.
Figure 3. The finished model that I’m about to make a mold of. This one has shipping tape on the outside, but I’ve found anything that makes it shiny and smooth will work great.
Figure 4. This is the reverse mold of the object in the previous picture, done using a two-part silicone rubber mold kit you can get online or at a local art store. You mix the two things in the bottles in a 5:1 ratio, and then pour it over the object to be cast.

Once I had the mold, used a two-part clear polyurethane resin kit, again found at a local art store. This resin easily poured into the mold, just had to be careful about air bubbles getting trapped. I wish I had access to a vacuum, but even the little imperfections look cool, as you can tell right away it's not some factory part. For this particular project, I had to tint the clear polyurethane with a red transparent dye. The hardest part is knowing how much to add to the resin, as we can see....

Figure 6. Here’s two different hummingbirds, my first and second attempt. The first one was the perfect color red, but then I began to cut into the resin to make room for the bulb, and it started to get pink real quick. Now it’s a very feminine paperweight.
The first time I added dye, I just put in two or three drops and it looked like the right color red. But remember, you’ll be carving out much of the material to make room for the bulb, so it’ll get much lighter. The second effort I added about half an ounce of dye and it was black as hell, but when I carved it out, it was perfect.
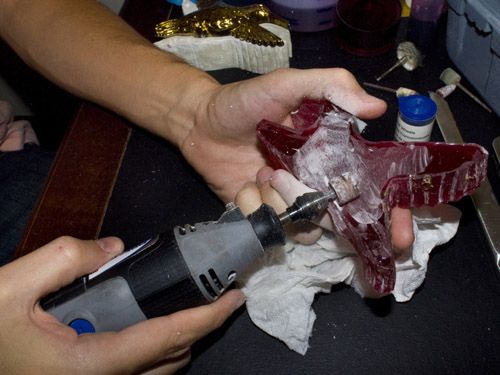
Figure 7. Diggin’ away with a dremel. Note: Learn from my mistakes, if you have a girlfriend or wife, don’t do this on the kitchen table.
Once the resin is dry, you can start carving room out for the bulb. Easy to do with a dremel, and the residue cleans up nice with just soap and water. The resin is hard as hell, so you don’t have to worry about cracking or breaking it. Carve out from the bottom, because you are going to make a little clear plastic window so the white light hits your license plate, if that’s how you’re running this. Otherwise, dig from the back and be easy.
Figure 8. The sky’s the limit. I made a brass ring around the back, a clear window for the license plate illumination, I even made a light for another bike out of the cap of a spraycan. Go nuts you crazy bastards!
Figure 9. On the bike, the light was looking good. There will always be some imperfections in the resin; some little air bubbles cannot be avoided, but it’s got a vintage, clearly one-off look to it that separates it from the CNC or machine-cast parts out there.

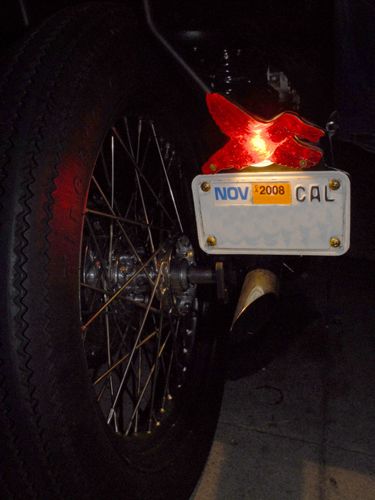
Figure 10. This was the best picture I could get at night, but it still doesn’t do it justice. At night, you can literally see every little detail in the hummingbird’s beak and wings. The resin had this nice warm red color. If someone rear-ends me, I’ll punch them in the brain.
Figure 11. Warm and fuzzy. Here you can see the holes drilled for the brass screws, the resin is mighty tough so you don’t have to worry about cracking it.
Okay, that’s all there is to it. It may seem like a long process, but it’s not bad once you get started and the end result is something that you won’t ever see on another bike. You could also use the same process to copy an old tombstone or maltese cross light, in that case you already have a good model. But, hell, I want to see that damn viking riding a wolf!
Related Products


